Dear Byam Parents,
I am hoping to do a project with a few recycled materials. If you have any of these at home, I would love to reuse them for an art project! Also, I am always looking for a few cleaning and housekeeping products as well. Thank you so much in advance!
Molly
-CDs or DVDs
-Bottle caps
-Sponges
-Rubber Bands
-Clorox wipes
-Tissues
-Baby Wipes
-Hand Sanitizer
Wednesday, November 26, 2014
Monday, November 24, 2014
2nd Grade self-portraits
2nd Graders have been working on self-portraits for a few weeks. They completed a first draft self-portrait and then I showed students how to draw certain features in the correct placement. We also talked about several artists who painted self-portraits including Vincent Van Gogh, Frida Kahlo, and Chuck Close. Below is the first draft and next to it is the final drawing. Look at the difference!
After, we colored in our face with crayons and painted a watercolor background. Students wrote different adjectives that describe them in the background as well. If you click on the picture you may also be able to read the artist statement!
After, we colored in our face with crayons and painted a watercolor background. Students wrote different adjectives that describe them in the background as well. If you click on the picture you may also be able to read the artist statement!
Wednesday, November 19, 2014
Kindergarten Fall Trees
Kindergarteners have been studying how the leaves change colors and fall off the trees (and now they're just about all gone!) this month in the art room. We first started this project by painting our sky and grass with watercolors and pastels.
Next, we added tree trunks and learned how to draw branches reaching out. After, we used toothbrushes to paint leaves on our trees. Students had fun using the toothbrushes in a different way! We also talked about the textures and prints the toothbrushes left behind. Here is some artwork below!
Tuesday, November 18, 2014
Grade 1 Farm Landscapes
First Graders looked at different artists including Andrew Wyeth, Vincent Van Gogh, Walt Curlee, and Claude Monet. Then we talked about perspective and learned that objects further away are smaller. We learned about the foreground, middle ground, background, and the horizon line in a landscape. Students had a fun time coming up to the Smart board and drawing the horizon line on the screen. They were amazed with how the "magic pen" changed colors on the screen. Then we drew our own landscapes. First we started with the horizon line and then drew our farmhouses.
Next, we used our rulers to draw perspective lines (rows of crops) that all started from the outside of our page and met our farmhouse. Students also learned how to draw a three-dimensional house.
After, we drew clouds in the sky with white pastels and then painted on top using watercolors. These first graders did an amazing job!
Friday, November 14, 2014
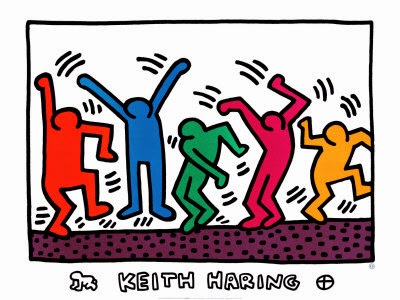
3rd Grade Keith Haring Figures
3rd Graders had a blast learning about figure drawing and exploring artists who portrayed the human body in different ways. During the first class, we learned how to accurately draw the human body in realistic proportions by using a scale. The next class, we learned how to draw more animated and cartoon like figures similar to Keith Haring. Here is another website for more information and lessons for kids based on his artwork.
After we drew figures in pencil, we then talked about complementary colors for our final project. Students drew their figure on one paper and line designs on another. They "hid" different objects or symbols within their lines like Keith Haring did. Then, we wrote the objects on the back and had a little "I Spy" game at the end of class!
Students also collaborated together to make a class project based on one of Keith Haring's artworks below.
They had a great time working together and the results were amazing!
4th Grade Radial Symmetry Kaleidoscopes
In 4th Grade, we learned about radial symmetry vs. linear symmetry. We looked at a few different images like a butterfly, beetle, and then an orange and a flower. Students each guessed which image had radial or linear symmetry before I gave them the definitions. Here is a picture below that shows radial vs. bilateral (or linear) symmetry fairly well.
Students also learned about the history of kaleidoscopes and that each image can never be repeated. We all agreed that each kaleidoscope image showed radial symmetry like this one below.
Then, we talked about geometric vs. organic shapes (a tricky concept!)
Geometric shapes such as circles, triangles or squares have perfect, uniform measurements and don't often appear in nature.
Organic shapes are associated with things from the natural world, like plants and animals.
After students folded paper and cut out both geometric and organic shapes, they glued down the pieces to black paper. They came out beautiful! Can you find the radial symmetry below?
Subscribe to:
Comments (Atom)


